• Home
  • Suggest A DIY
  • DIY Newsletter

Scrap Booking

Themes, layouts and inspirations

  • About CraftGossip
  • Our Network
    • Bath & Body Crafts
    • Candle Making Ideas
    • Crochet Ideas
    • Cross Stitch
    • Edible Crafts
    • Felting Patterns
    • Glass Art
    • Home & Garden Ideas
    • Indie Crafts
    • Jewelry Making
    • Kids Crafts
    • Knitting Patterns
    • Lesson Plans
    • Needlework
    • Party Ideas
    • Polymer Clay
    • Quilting Ideas
    • Recycled Crafts
    • Scrapbooking
    • Sewing Patterns
    • Card Making
    • DIY Weddings
    • Not Craft Ideas
  • Giveaways
  • Roundups
  • Store
  • Search

Photocropology

June 27, 2008 by sarah hodsdon

Photocropology sounds like the study of something unmentionable….it isn’t, I just made it up (at least nothing showed up when I Googled it a minute ago…. so, you heard it here first folks). It’s the science of cropping a picture for your scrapbooking project. You keep the photo and get rid of the “crop”….you know, all the distractions, the things in the background that have nothing to do with the vibe you want for your page, or maybe even a blurred or less than flattering image (the person picking their nose in the background for example). Most scrapbookers learn how to crop their photos in the very beginning of their journey. It is usually a painful process for some because they have a deep attachment to the whole photo and cutting out parts of it is just, well, unheard of. Cutting your pictures used to mean that you could fit more photos on a page. Now, how you crop a photo is as much of a design element as any embellishment. How we cut our pictures invites our audience to look closer, focus on a part rather than the whole, and helps us define the story we want to tell in the process. There are many scrapbooking artists that constantly blow me out of the water with their fresh and unique voices. Take a look at this lay-out I snagged from Donna Downey’s Scrapbook album…

I know the picture is little, it’s a thumb nail and it’s on purpose…… I want you to look at her album to get a better look. Donna has an amazing way of highlighting the moment. Every person that looks at this picture sees a pretty little girl and her amazing smile. Sometimes a part of the picture really is greater than the sum of all the little parts. When you are at your own desk, working on your own page, concentrate on the elements. Ask yourself, “what was this moment about?”, “what is it that made me want to take this picture?”, “what is the thought or story I want whomever looks at this years later to get from this?” When you ask yourself these questions, the picture will come into focus a bit clearly, you will think about what you want to stay in the picture and what doesn’t belong there. It is a distilling process that leaves us with the “good stuff”. For those wanting to take their art to the next level, I encourage you to spend some time over at Donna’s site and if you get the chance to take a class with her, give yourself that gift- it’s worth it!
«
»

Comments

  1. Chrissie says

    June 30, 2008 at 11:33 am

    I do love how you dared us to take those scissors to our beloved photos and to take scrapbooking to an art form rather than just a way to organize our photos. If one wanted to do that skip the scrapbooking and put the pictures in a photo album 😉 less time and effort that way. Daring is what makes art worth while. It’s the artist that dared that makes their mark. It’s the dare that leaves us breathless and wide eyed with wonder. It’s the dare that sends a tingle down our spines to look at it. It’s that dare that stays with someone following them around for days like a friendly ghost or half remembered dream. That is art.
    Although, if you ever find yourself unable to cut up that picture my advice is to scan it on your comp put it on a USB and take it over to your local photo lab and print out an extra copy for cutting up. Not only does this mean you don’t have to lose the whole picture. You have an extra copy on your computer to share with others, and in case you totally screw up the cropping!

  2. sarah hodsdon says

    June 30, 2008 at 8:00 pm

    Can I just say, I printed your comment out and put it on my wall of fame in my studio….you have it so right! What an amazing inspiration. So true with the scanning thing too. I try to make sure to remind my students to not only scan their pictures but, their collages and paste papers as well- they make wonderful backgrounds and custom scrapbook paper 🙂 Thank you for making my day with your insightful comment!

Have you read?

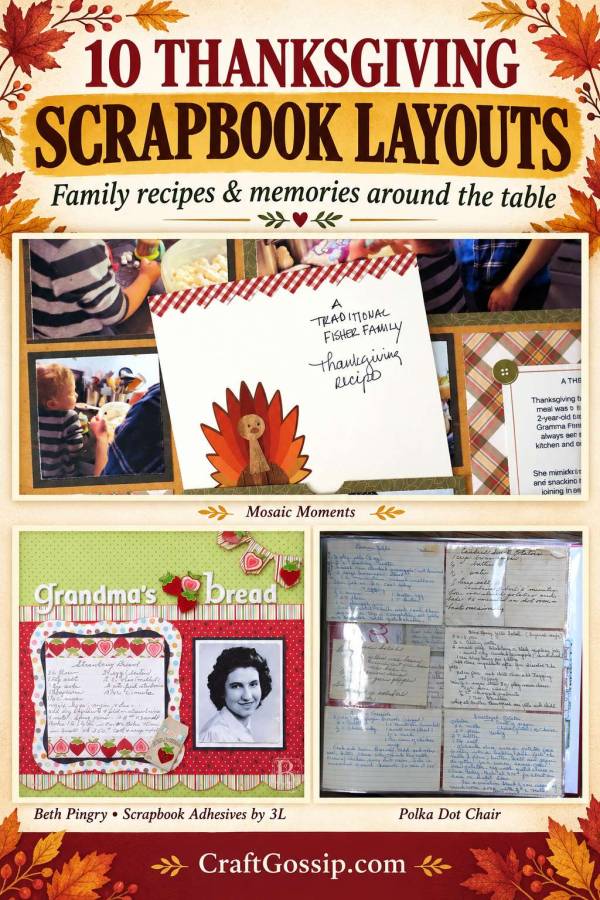
Thanksgiving Scrapbook Layouts That Tell the Story Around the Table

A handwritten recipe card can hold an awful lot more than the instructions for making stuffing. There’s the familiar handwriting, the ingredient crossed out and replaced, and perhaps a little note reminding everyone to double the butter. Some of the most treasured family recipes are barely recipes at all—just a list of ingredients and the optimistic instruction to bake until done.

Those little scraps of paper deserve a place in our family albums. Thanksgiving scrapbook layouts give us a lovely opportunity to preserve them alongside photographs of the people who made them, the kitchens they came from and the meals we still look forward to every year.

I love a beautifully decorated scrapbook page, but give me a slightly crooked recipe card with someone’s handwriting on it and I’m immediately interested. Who made it first? Was it always served in the same dish? Did someone faithfully follow the instructions while another family member quietly added their own improvements? That’s the story worth saving.

These Thanksgiving scrapbooking ideas bring together holiday layouts, recipe pages and album techniques you can adapt for your own family traditions. Some examples were created specifically for Thanksgiving; others offer clever ways to display handwritten recipes, kitchen photographs and food memories with your own autumn papers.

Tuck a Family Recipe Behind Your Thanksgiving Photographs

Andrea Fisher’s A Thanksgiving Memory layout at Mosaic Moments combines photographs of family food preparation with a pocket holding a treasured recipe and its current variation. I love how the page connects a younger kitchen helper with a tradition started by an earlier generation. This is a lovely approach when you want room for photographs, proper journaling and the recipe itself without squeezing everything onto the background.

Give Grandma’s Handwriting the Spotlight

Beth Pingry’s Grandma’s Strawberry Bread scrapbook page at Scrapbook Adhesives by 3L puts a family recipe at the centre of the design, with layered strawberry embellishments adding dimension. The original project incorporates a pocket for a disc containing scanned recipes, and the post also suggests a keepsake envelope as an alternative. Borrow the recipe-focused composition for a Thanksgiving favourite, changing the strawberry details to pumpkins, apples or whatever suits your dish.

Build Pocket Pages for Handwritten Recipe Cards

This handwritten family recipe album from Polka Dot Chair uses divided page protectors to organise inherited recipe cards alongside newer handwritten family favourites. There’s also a clever flip-out sleeve idea for cards with writing on both sides. I’d adapt this into a Thanksgiving section with recipes grouped by the person who contributed them, adding a small portrait and a few words about their place at the family table.

Tell the Story of a Family Thanksgiving Joke

The Family Gatherings Thanksgiving layout at StampinBuds celebrates a daughter’s annual pose in front of the feast, pretending she cooked the entire meal. Photographs run across the double-page spread, with autumn patterns, pie accents and journaling strips supporting the story. It’s a wonderful reminder to record the jokes attached to the meal, whether that’s someone claiming credit for the cooking or the yearly debate over whose stuffing is best.

Photograph a Favourite Recipe from Start to Finish

Sue Smith’s recipe scrapbook tutorial at Hobbycraft arranges circular photographs across an open spread, alongside handwritten ingredients and instructions. Gingham, doilies and twine give it a welcoming kitchen feel. I’d use this format to document making a family pie, including the floury worktop, the pastry rolling and the finished result—particularly if someone is teaching the recipe to the next generation.

Make a Digital Recipe Page to Share with the Family

The family recipe digital scrapbook guide from Anna Aspnes Designs explains how to combine scanned or typed recipes with photographs and digital artwork. This approach is especially useful when several relatives would love a copy of the same handwritten card. For Thanksgiving, I’d pair the recipe with a photograph of its original cook and a more recent picture of someone in the family making it today.

Create a Page Celebrating the Family Cook

The “Featured Chef” idea in Made With Love at Creative Memories suggests building a layout around a favourite family recipe or the person behind it. That’s a lovely starting point for a Thanksgiving tribute to the relative who always makes the gravy, brings the rolls or arrives carrying the much-anticipated dessert. Add their photograph, a copy of their recipe and a sentence or two about what makes their contribution special.

Add Pull-Out Recipe Tags to Your Layout

These recipe scrapbook pages by Theresa Forge, featured at ScrapbookingStore, combine colourful papers and kitchen embellishments with an envelope-style arrangement for removable recipe tags. I particularly like the idea of letting readers pull out a card rather than trying to read everything around the decorations. Adapt the colours for Thanksgiving and use the tags for different family contributions, with each cook’s name written clearly at the top.

Borrow a Geometric Design for a Thanksgiving Baking Page

Carol Chastain’s Pizza Dough recipe layout at Felicity Jane uses triangular paper shapes, folded edges and a deliberately worn-looking recipe card. Although the original celebrates pizza making, its food-inspired geometry could translate beautifully into a page about Thanksgiving pie. Keep the recipe readable, add your own baking photographs and use the triangular shapes as a gentle nod to a slice waiting to be served.

Start a Thanksgiving Recipe Scrapbook to Pass Down

Our Recipe Scrapbooking project at CraftBits offers a straightforward starting point for arranging recipes with decorative borders, backgrounds and themed details. It’s a flexible approach if you’d rather build a collection gradually than commit to a complicated album straight away. Begin with one Thanksgiving recipe this year, adding a photograph and a little family history, then invite another relative to contribute the next page.

Save the Stories That Aren’t Written on the Recipe Card

Before you start decorating, ask a few questions. Where did the recipe come from? Who introduced it to the family? Has it changed over the years? And what does “a good handful” actually mean?

Those answers can become the most interesting part of the page. A recipe might have arrived with a neighbour, been clipped from an old magazine or developed through years of making do with whatever was in the cupboard. Record what you know, including the little changes your family makes now.

I’d scan or photograph precious handwritten cards before working with them, then use printed copies for cutting, layering and decorating. You can keep the originals separately and still enjoy all the character of the handwriting on your finished pages. If the writing is difficult to read, add a typed version alongside the copy.

Leave space for the people as well as the food. A photograph of the cook holding their serving dish, a grandchild stirring the bowl or everyone helping themselves at the table gives the recipe context. You don’t need perfectly styled food photographs; you need pictures that bring the day back.

And if your family’s treasured Thanksgiving contribution comes from a packet, a bakery or the supermarket freezer, scrapbook it anyway. Traditions earn their place through the memories attached to them. The important thing is remembering who brought it, who loved it and why it kept appearing on your table.

Explore

backgrounds Christmas Crafts Design Theory die cutting embellishments family Freebies Free Printables Holidays Inspiration - Layout Ideas Journaling News Paper Crafts Scrapbooking Themes Scrapbook Titles Techniques Tips and Tricks Tutorials Tutorials & Ideas

RSS feed: More Articles More Articles

  • DIY Terracotta Pot Miniature Pond: A Mossy Little Water Garden for Your Patio
  • Book Review: Stitches from the Yuletide by Kathy Schmitz
  • Thanksgiving Scrapbook Layouts That Tell the Story Around the Table
  • How To Make Christmas Resin Jewelry: Easy Handmade Pendants, Earrings And Gift Ideas
  • Christmas Bookstore Cross Stitch Design Review: A Cosy Find for Book Lovers
  • 10 Knitted Christmas Bauble Patterns for a Tree Full of Handmade Charm
  • The Official Stardew Valley Crochet Book: That Rooster Had Me Hooked
  • Christmas on a Budget – 7 Christmas Table Decorations You Can Make from Paper to Save Money
  • Easy Christmas Fabric Gift Basket Sewing Pattern (Perfect for Beginners)
  • 12 Christmas Cross Stitch Patterns for Cat Lovers

Copyright © 2026 · CraftGossip | Start Here | Contact Us | Link to Us | Your Editors | Privacy and affiliate policy