• Home
  • Suggest A DIY
  • DIY Newsletter

Scrap Booking

Themes, layouts and inspirations

  • About CraftGossip
  • Our Network
    • Bath & Body Crafts
    • Candle Making Ideas
    • Crochet Ideas
    • Cross Stitch
    • Edible Crafts
    • Felting Patterns
    • Glass Art
    • Home & Garden Ideas
    • Indie Crafts
    • Jewelry Making
    • Kids Crafts
    • Knitting Patterns
    • Lesson Plans
    • Needlework
    • Party Ideas
    • Polymer Clay
    • Quilting Ideas
    • Recycled Crafts
    • Scrapbooking
    • Sewing Patterns
    • Card Making
    • DIY Weddings
    • Not Craft Ideas
  • Giveaways
  • Roundups
  • Store
  • Search

Giveaway: $50 Peachy Cheap Gift Certificate!!

March 25, 2010 by Francine Clouden

We are pleased to partner with Peachy Cheap to give away a $50 gift certificate! Peachy Cheap is an online store that features one deeply discounted scrapbook product each day. Prices are 50% to 85% off retail, meaning that the retail value of the certificate is at least $100! If you’re looking to save money on scrapbooking you need to check out the site!  Today’s deal is the 36″ Clip It Up Ribbon Organizer for only $34.99 (regular price $80)

To enter the giveaway please leave a comment below, telling me how you save money on scrapbooking.

Want more entries?

1. Follow Craft Gossip on Twitter and tweet this: ” Peachy Cheap $50 Gift Certificate  Giveaway on @CraftGossip http://bit.ly/crzSa8 “. Then leave a link to your twitter profile in the comments for an additional entry.

2. Become a fan of the  Scrapbooking on Craft Gossip Page on Facebook and then post this as your Facebook status update: ” Peachy Cheap $50 Gift Certificate  Giveaway on @CraftGossip http://bit.ly/crzSa8 ” Then leave a link to your Facebook profile in the comments for an additional second entry.

3. If you have a blog, blog about this giveaway and leave a link in the comments to your post for an additional entry.

International readers please note: Peachy Cheap only ships to the US and Canada.

Entries will close next Wednesday, March 31st at midnight EST. Winner announced Thursday April 1st. When commenting please enter a valid e-mail address in the field provided (not in your comment) so that we can contact you if you are the lucky winner. Good luck!

Comments are now closed for this post. Thanks for entering the giveaway!
«
»

Comments

  1. Jessica says

    March 25, 2010 at 7:45 am

    coupons, or recycling things I already have. old ribbons, buttons, and cards sent for my birthday or Christmas work really well…

  2. Melinda Wilson says

    March 25, 2010 at 8:35 am

    A friend of mine and I sometimes will go in together to buy scrapbooking supplies and then split them. Especially if we order online because we can usually put a big enough order together to get free shipping. Also, I subscribe to my lss blog, facebook or newsletter and watch for their sales.

  3. Christi Grace says

    March 25, 2010 at 8:51 am

    I don’t buy unless I have a coupon in my hot little hand! Also, I got a great deal on a Silhouette digital cutting machine ($100!!) which allows me to save money by :downloading free GSD files, purchase cutting files (most cost less than $2),I no longer buy expensive dies/cartridges and make almost of my own embellies. The machine has more than paid for itself! Not mention I sold all those old cumbersome dies!

  4. Jill S. says

    March 25, 2010 at 8:51 am

    Easy. I let my husband see everything I buy and suddenly my scrapbook budget is instantly cut!

  5. Tina S. says

    March 25, 2010 at 8:57 am

    Oh, I love Peachy Cheap! My mantra is never buy anything unless it is on sale! For things like papers, stickers, adhesives, albums and items I consider to be “staples” for scrapbooking, I watch the sales and buy accordingly. If I want a specific item I watch and wait for it to go on sale. If I need something RIGHT NOW I can usually find something in my stash to substitute or can make it myself. Tim Holtz’s filmstrip ribbon has been the most notable exception of late. I searched everywhere and finally paid retail. My basic philosophy is the same one I have for grocery shopping–Buy in bulk and on sale!

  6. Danielle Knippenberg says

    March 25, 2010 at 9:00 am

    I watch all the sales, I hardly by anything full price, Hobby Lobby has great 50% sales, and I use coupons at Michaels. I also have several sites I visit that have great deals.

  7. Vernell says

    March 25, 2010 at 9:03 am

    Lately I have been trying to use my Making Memories Slice to make embellishments for my pages as well as collecting online tutorials for handmade stuff so that as I need things I can quickly make them. I use coupons for Michaels and AC Moore a lot and try to wait until I have a coupon or stuff goes on sale to buy things that I want/need. I also subscribe to a kit club and by getting a sampling of goodies every month this helps to curb the need to be constantly shopping for scrap stuff. In addition, I check out Peachy Cheap (love when they have Thickers grab bags), Scrapbook Steals, and Crop Chocolate on a daily basis for any great deals.

  8. Marie Beck says

    March 25, 2010 at 9:11 am

    I have been scrapbooking since I was 15 and then there weren’t as many scrapbooking options. I made my own things with cardstock and xacto knife and random stickers and markers, crayons, et. I still do a lot of this today and sometimes go back and add to old scrapbook pages. I like to find many things in thriftstores to use in scrapbooking now too. Other than coupons & sales and craft supply swaps are great!

  9. Teresa Novak says

    March 25, 2010 at 9:16 am

    I always shop with coupons or hit the sales, and I reuse anything that looks fun and interesting.

  10. Vernell says

    March 25, 2010 at 9:32 am

    Awesome give away – I became a fan on Facebook – http://www.facebook.com/home.php?#!/profile.php?ref=profile&id=661368934

  11. Whitney H says

    March 25, 2010 at 9:37 am

    I shop at peachy cheap! Plus, i always use coupons and i keep my scrapbooks simple!

  12. Vernell says

    March 25, 2010 at 9:59 am

    Also tweeted – http://twitter.com/scrappervern

  13. Dawn in NJ says

    March 25, 2010 at 9:59 am

    I save money by organizing everything really well. By doing that I find what I want, when I want and I don’t go buy duplicates!

  14. Sondra says

    March 25, 2010 at 10:02 am

    I buy clearance at the craft stores and shop hardware and office supply stores for items that I can get cheaply there. I also recycle packaging and tags from clothing and other items to repurpose for scrapping supplies.

  15. j.leija says

    March 25, 2010 at 10:05 am

    love peachy cheap!! what an awesome give away 🙂 i save money simply by avoiding stores, planning months when all i buy are refills and budgeting

  16. Sandi James says

    March 25, 2010 at 10:26 am

    Peachycheap is awesome. I also save money by making purchases at my LSS on class/crop nights — she offers 10% off. Swapping with other scrappers is a fun way to get new supplies as well.

  17. Sandi James says

    March 25, 2010 at 10:30 am

    I’m your newest fan: http://www.facebook.com/home.php#!/profile.php?ref=profile&id=1151318492

  18. Jen says

    March 25, 2010 at 11:32 am

    I save by trying to use my scraps. When I am doing a page I go to my scraps first, that way I don’t have to use a new piece of paper. (less trips to my lss.)

  19. Debra - Naples, FL says

    March 25, 2010 at 1:46 pm

    I save the cardstock pieces things are packaged with, sometimes they are cool colors or just to use for backings of cutouts. They are free.

    I want to buy the face stampsif I win!!

  20. Sandra says

    March 25, 2010 at 2:31 pm

    I always make sure I have coupons on hand when I shop at Jo-Ann or Michaels. And of course, I check Peachy Cheap every day!

  21. Candice Reszko says

    March 25, 2010 at 2:31 pm

    Definitely using scraps and packagings! I try to use every part possible. I like the saying in Series of Unfortunate Events. There is always something!!!

  22. Laurie Marmon says

    March 25, 2010 at 2:55 pm

    I try to keep all of my scraps. I organize them in color just like my 12×12 sheets for easy access and then I make sure that I use them. 🙂 I’ve also looked at using some of the packaging as companies are starting to offer a little bonus on there too!

  23. amy harrison says

    March 25, 2010 at 4:28 pm

    I always shop at Peachy Cheap to save my money.. They are fabulous!

  24. Nathalie says

    March 25, 2010 at 4:31 pm

    I always try to have a coupon when I buy something or at least wait for the item to be on sale. I also cut my glue dots in two and cut holes in my papers when I do multiple layers.

  25. Rean C says

    March 25, 2010 at 5:06 pm

    I’ve bought stuff from PeachyCheap and that saves me money. I try to make my own embellishments using my MM Slice. I also recycle stuff I could, such as ribbon, pretty cards..

  26. Michelle M says

    March 25, 2010 at 5:09 pm

    I always use every bit of scrap paper. I repurpose items. And I always shop with coupons.

  27. Brittney Aldous says

    March 25, 2010 at 5:18 pm

    I have purchased from Peachy Cheap (love them!), and I also save by buying designer papers on sale. About 3 months after a line is released at my LSS, they usually go on sale =)

  28. Kristie Maynard says

    March 25, 2010 at 5:44 pm

    Just became a facebook fan! Here is a link to my profile:
    http://www.facebook.com/pages/Scrapbooking-on-Craft-Gossip/103537616350372#!/profile.php?ref=profile&id=1557011093

    To save money on scrapbooking I try to only shop sales and clearance, I also shop places like Peachy Cheap, they are already in my Favs and I check them daily. If I can make it instead of purchasing it I try to do so. Right now I am on a “spending diet” and am trying to only work from my stash.

  29. Connie says

    March 25, 2010 at 5:52 pm

    I use my MM Slice and shop sales.

  30. naazia says

    March 25, 2010 at 6:40 pm

    i save money by recycling things as much as possible. oh and the clearance aisle!

  31. Lindsey says

    March 25, 2010 at 7:19 pm

    I subscribe to a kit club and it saves me money because I would just go hog wild in a scrapbook store if I had to pick everything on my own!

  32. anthy says

    March 25, 2010 at 8:08 pm

    I keep an eye on sales (online and off) and I grab every 40-50% off Joann Fabrics and Michaels coupon I can find.

    Thank you very much for the giveaway!
    anthy_stl [ATT] yahoo [DOTT] com

  33. anthy says

    March 25, 2010 at 8:08 pm

    I follow you on twitter, and tweet! http://twitter.com/my_twitraccount/status/11069506590
    anthy_stl [ATT] yahoo [DOTT] com

  34. Minnarie says

    March 25, 2010 at 8:44 pm

    I shop online! I can usually find promo codes. Otherwise just enting the item I want into google shopping brings up tons of results and I can find the cheapest place!

  35. Marie Phillips says

    March 26, 2010 at 3:55 am

    Awesome! I check the deal daily, and purchase frequently! Thanks for the chance to win!

  36. Kris Dingfedler says

    March 26, 2010 at 5:12 am

    http://twitter.com/Curious_Coffee
    (My Tweet)

    http://www.facebook.com/home.php?ref=logo#!/profile.php?id=45802747
    (My Facebook)

    http://themadisonadventure.blogspot.com/2010/03/who-can-pass-up-giveaway.html
    (My Blog)

    I’m super excited about this!!! Now I have to wait until next week to find out though. :S

  37. Jennifer says

    March 26, 2010 at 5:20 am

    I save money on scrapbooking by trying to use supplies that I already have instead of buying new ones. But it is SO hard to do sometimes when all the new stuff comes out!

  38. jennie says

    March 26, 2010 at 5:49 am

    I love peachy cheap! Ive score some killer deals there! Thats been my top money saver. Also I try to buy only what I know I’ll use, not just what I think is cute:)

  39. Amy Chretin says

    March 26, 2010 at 8:13 am

    I just became a facebook fan and i put the message in my profile.

    http://www.facebook.com/profile.php?id=100000063640886

  40. Amy Chretin says

    March 26, 2010 at 8:15 am

    I am already a twitter follower and just tweeted your message. “creativechretin” is my username.

  41. Amy Chretin says

    March 26, 2010 at 8:16 am

    I try to save money buy, using stores like peachycheap. I also buy a lot of stuff at Big Lots (they have Thickers for $2 each), and i only buy things i know i will use!

  42. Stephanie says

    March 26, 2010 at 10:22 am

    I try to find multitasking tools. (Instead of tools that only do one thing!) Oh, and if I can buy something at my hardware store instead of the scrapbook store, I do! (Wire brushes and sandpaper!)
    I also use the Scrap Our Stash Frugal Friday tips! Check it out: scrapourstash.blogspot.com

  43. Tina Phillips says

    March 26, 2010 at 11:15 am

    I try to buy on sale and I swap a lot with people. Also I try to use every little piece I can and have become quite creative at using up scraps. And to echo what someone else said….BIG LOTS!!! I ahve bought fiskers punches for 5 bucks and basic grey chip board for $1!!

  44. Maryellen W says

    March 26, 2010 at 2:12 pm

    I shop Peachy Cheap and Crafty Steals dot
    com. I recycle things, shop at the dollar
    store and never buy anything unless it’s on
    sale or if there is a coupon. I also think
    twice when buying anything, asking myself “Do
    I really need this?” and half the time I leave
    without buying.

  45. Lisa says

    March 26, 2010 at 3:01 pm

    I have bought a lot in the past but not anymore. I’m using up my stash!! It feels good to use what I have.

  46. Heidi says

    March 26, 2010 at 8:37 pm

    I save money on regular supplies by shopping online, and hitting sales whenever possible. I also swap with friends, and use recycled/unconventional materials for embellishments.

  47. Heidi says

    March 26, 2010 at 8:38 pm

    I follow on Twitter & tweeted http://twitter.com/digitalmisfit/status/11126449389

  48. Tracy says

    March 27, 2010 at 12:35 am

    I have to be really careful with my budget. DH trys to turn a blind eye because he knows I shop sales and use coupons. I recycle and do a lot of home made stuff. I sales some of my work to friends and co-works too to make up the cost of others.

  49. Carmen says

    March 27, 2010 at 7:53 pm

    Tweet: http://twitter.com/cmouse01

Newer Comments »

Trackbacks

  1. Christmas Gift Cards for Moms and the Special Women in Your Life says:
    March 26, 2010 at 5:52 am

    […] Giveaway: $50 Peachy Cheap Gift Certificate!! · Scrapbooking @ CraftGossip […]

Have you read?

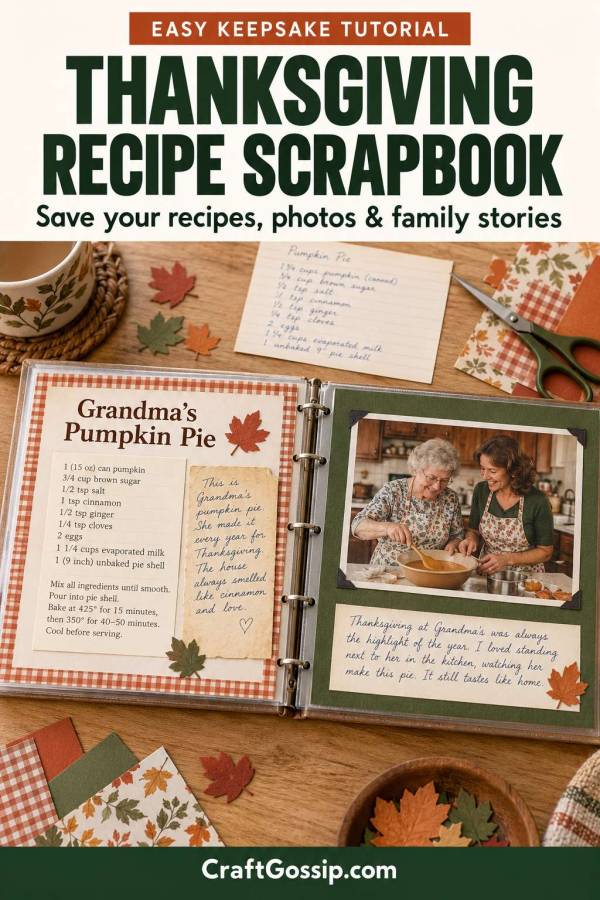
How to Make a Thanksgiving Family Recipe Scrapbook

T

here’s usually one dish that has to appear on the Thanksgiving table. Someone might suggest changing things up, but leave out that particular recipe and suddenly everyone has opinions.

Perhaps it’s a stuffing recipe written on a faded index card, a pie someone makes without measuring, or a casserole that has been appearing at family gatherings longer than anyone can remember.

Those recipes deserve a home alongside the people and stories that make them special.

A Thanksgiving family recipe scrapbook combines favourite dishes, handwritten recipe copies, cooking photographs and family memories in one keepsake album. You can make it for yourself, give it to an adult child, or gradually build a collection to share with the grandchildren.

And you can start with just three recipes. There’s no need to document the entire family menu before you’re allowed to call it a scrapbook.

Choose a Simple Album You Can Add To

For this project, I suggest an 8×8-inch scrapbook album with removable page protectors. It gives you enough room for readable recipes while keeping the finished book manageable.

Check that the protectors accommodate actual 8×8-inch inserts. Album cover measurements and usable page measurements aren’t always the same.

A ring-bound album makes it easy to add recipes, rearrange sections and replace a page later. Choose one with room for expansion, especially if you plan to include pockets or layered decorations.

Our older recipe scrapbooking project on CraftBits explores the idea of turning collected recipes into a decorated keepsake. Here, we’re giving the album a Thanksgiving focus and adding the family stories that make each dish worth remembering.


What You’ll Need

  • An 8×8-inch scrapbook album and compatible page protectors
  • Acid-free cardstock for page bases
  • Two or three coordinating patterned papers
  • Printed recipe copies
  • Copies of handwritten recipe cards, if available
  • Printed photographs of family members, food or holiday preparations
  • Photo-safe adhesive or photo corners
  • Scissors or a paper trimmer
  • A ruler and pencil
  • A journaling pen

Optional extras include alphabet stickers, paper labels, small leaf embellishments, ribbon and adhesive suitable for attaching paper pockets.

Cream, rust, olive green and warm brown make a lovely Thanksgiving palette. Gingham and woodgrain papers work well, too. Start by checking your stash before buying a collection that contains six pumpkins you love and twelve papers you’re afraid to cut.

If you’re shopping on Amazon for page protectors or adhesives, check the product specifications for photo-safe materials and compatibility with your album.

1. Gather Three Meaningful Family Recipes

Choose a small starting collection. A useful combination is:

  • One main dish or substantial side
  • One recipe associated with a particular family member
  • One dessert everyone looks forward to

Ask relatives to send photographs of their recipe cards or write out their versions. If someone cooks by instinct, arrange a time to watch them make the dish and record the quantities together.

Include the details a new cook would need: ingredient amounts, oven temperature, approximate cooking time, pan size and serving yield, where known.

Keep the original recipe wording in a scanned copy, then add clearly labelled notes explaining family adjustments. If a measurement or instruction is uncertain, mark it as needing confirmation rather than guessing.

2. Copy the Handwriting and Keep the Originals Safe

Handwriting adds something a typed recipe cannot. The little corrections, underlined ingredients and notes squeezed into the margin are part of the recipe’s history.

Scan or photograph both sides of a handwritten card before creating your page. Print a copy for the scrapbook and store the original separately.

For a clear phone photograph:

  1. Place the card flat in even daylight.
  2. Hold the phone parallel to it.
  3. Check that your shadow isn’t covering the writing.
  4. Photograph the reverse if it contains notes.
  5. Crop the image and check that the smallest writing is readable.

Avoid permanently gluing or laminating an irreplaceable original. A printed copy lets you enjoy its appearance without repeatedly handling the actual card.

3. Plan One Two-Page Spread for Each Recipe

Use the same basic arrangement throughout the album:

Left page: Recipe title, readable recipe and a short note about its source.

Right page: Photograph, family story and an optional pocket for extra notes.

That repeated structure makes the album easier to create and easier to use. Change the patterned paper or embellishments between recipes while keeping their main positions consistent.

If arranging a page feels intimidating, our guide to making a basic scrapbook page explains how photographs, layers and journaling work together.

4. Make a Readable Recipe Page

Here’s a simple arrangement for an 8×8-inch page:

  • Cut one cardstock base to 8×8 inches.
  • Cut one patterned-paper panel to 7½×7½ inches.
  • Centre the panel on the base, leaving a ¼-inch border.
  • Prepare a recipe panel measuring approximately 6½ inches wide by 6 inches high.
  • Position it centrally, leaving space above for the title.

Keep the recipe panel plain or very lightly patterned. Dark text on a pale background is much easier to read than writing printed over decorative paper.

Print a draft at actual size before attaching anything. Around 12–14-point type is a useful starting point, but the final test is whether you can comfortably read it.

If the recipe doesn’t fit, give it another page. Smaller lettering is a poor trade for keeping everything on one sheet.

For a handwritten recipe copy, use the available space to show it at a readable size. Add a separate typed version when the original handwriting is difficult to follow.

5. Add a Photograph and the Story Behind the Dish

For the facing page, start with another 8×8-inch cardstock base.

A simple arrangement uses:

  • One landscape 6×4-inch photograph
  • One cardstock photo mat measuring 6¼×4¼ inches
  • One journaling panel measuring approximately 6¼×2¼ inches

Centre the photo mat near the top, leaving about ½ inch above it. Position the journaling panel below, with a small gap between them.

This fits comfortably on the page and leaves a little room for flat embellishments.

Choose a photograph that adds to the recipe’s story. It might show the cook, someone helping, the finished dish or the family gathered at the table.

Then write a few sentences explaining why this recipe belongs in your album.

You could record who usually makes it, how long it has been part of the meal, or the year someone accidentally doubled an ingredient and created a new family favourite.

Add names and an approximate date where possible. Future readers may recognise the pie long before they recognise everyone standing behind it.

6. Make an Optional Pocket for Extra Notes

A pocket is useful for a copied recipe card, a longer story or handwritten comments from relatives.

For a simple pocket:

  1. Cut a piece of patterned paper 6½ inches wide by 3½ inches high.
  2. Score ½ inch in from both short sides and one long side.
  3. Trim away the two small corner squares where the score lines intersect.
  4. Fold the three flaps towards the back.
  5. Apply adhesive to the backs of the flaps.
  6. Attach the pocket to a page, leaving the top open.

The finished pocket front measures approximately 5½×3 inches. A 5×3-inch insert will sit inside with its top edge exposed because of the bottom flap. Test the fit before decorating.

Use the pocket on a separate page or adapt your photo arrangement to make room. If it sits inside a page protector, you may need to remove the scrapbook page to reach the insert.

Keep the insert flat and lightweight so the album closes comfortably.

7. Add Thanksgiving Details Without Crowding the Recipe

Choose a few repeated decorative elements:

  • A narrow gingham strip
  • Small paper leaves
  • A simple recipe-name label
  • A little pumpkin beside the journaling
  • A consistent colour for photo mats

Keep thick decorations away from recipe text and photographs. They can make pages harder to slide into protectors and add bulk surprisingly quickly.

If you’d like more ideas for autumn colours and family storytelling, browse our thankful and grateful scrapbook layouts.

You can make a beautiful album using plain cardstock and a handful of paper scraps. Consistent colours and readable pages will do more for the finished book than a large pile of embellishments.

8. Create an Opening Page and Simple Contents List

Give your scrapbook a title that suits your family:

  • Our Thanksgiving Table
  • Recipes We Gather Around
  • Made with Love, Served with Stories
  • Family Favourites and Thanksgiving Memories

Under the title, add a short explanation of the project. For example:

“This album brings together the recipes we make, the people who taught us and the moments we want to remember.”

Include the year you started it and your name as the compiler.

A contents page can list the recipe names and page numbers. Leave room for additions, or create a replaceable contents sheet you can update later.

Questions to Ask Relatives About Their Recipes

A few gentle questions can uncover details that never made it onto the recipe card:

  • Who first taught you to make this?
  • When did it become part of our Thanksgiving meal?
  • Have you changed any ingredients?
  • Was there a special bowl, pan or serving dish you always used?
  • Who asks for this recipe most often?
  • What should a first-time cook know?
  • Is there a funny story connected with it?
  • What do you want the next generation to remember?

Write down their own words where you can. A small personal comment can bring a page to life.

Make It a Family Project

You can prepare the album before Thanksgiving and leave spaces for this year’s photographs.

Ask each household to contribute one recipe and one memory. Give younger family members a small card to draw their favourite dish or write a sentence about what they enjoy eating.

For relatives who live elsewhere, request a photograph of them cooking or serving their contribution. They can still be part of the album even when they aren’t at the same table.

If you’re making copies as gifts, scan the completed pages before placing them in protectors. Keep the digital files organised by recipe name so they’re easier to find and share.

A Few Mistakes Worth Avoiding

Decorating before checking the recipe: Confirm the text and measurements before building the page around them.

Making the writing too small: Use another page whenever readability starts to suffer.

Leaving out the cook’s name: Record who shared the recipe and what you know about its history.

Mixing updates into the original without explanation: Label changes so readers can distinguish the handwritten version from later adaptations.

Trying to finish every family recipe at once: Complete three spreads first. An album with room to grow is a perfectly good result.

Keep a Working Copy for the Kitchen

Even with page protectors, a keepsake album is best kept away from hot pans, spills and splattering food.

Print a separate working copy of a recipe when you’re cooking. You can scribble on that version, record adjustments and transfer useful notes into the album afterwards.

Save your scans and typed recipes somewhere you can find them again, too. The digital copies make it easier to replace a damaged page or share a recipe when someone calls asking how much butter Grandma actually meant.

You can begin this project with one recipe card and one photograph. Add the person’s name, explain why the dish matters and leave room for the next story.

The scrapbook will grow as your family keeps gathering, cooking and remembering. And perhaps, years from now, someone will make that familiar dish with your notes beside them.

Explore

backgrounds Christmas Crafts Design Theory die cutting embellishments family Freebies Free Printables Holidays Inspiration - Layout Ideas Journaling News Paper Crafts Scrapbooking Themes Scrapbook Titles Techniques Tips and Tricks Tutorials Tutorials & Ideas

RSS feed: More Articles More Articles

  • Christmas Stick and Stitch Embroidery Pattern – Etsy Review
  • A Nostalgic Christmas Pudding Knitting Pattern for Your Handmade Decorations
  • Quilt As You Go Tutorial (Beginner-Friendly Step-by-Step Guide)
  • Etsy Feature – Bread Pan Pottery Template
  • 10 Bucket Hat Knitting Patterns for a Fun Handmade Wardrobe
  • 10 Free Hot Water Bottle Cover Knitting Patterns for Cosy Nights
  • How to Make a Thanksgiving Family Recipe Scrapbook
  • 10 Triangle Scarf Knitting Patterns for Cosy Layers and Handmade Gifts
  • Free Christmas Pudding Cross Stitch Gift Tag Pattern With DMC Colour Key
  • 10 Thanksgiving Math Printables for Kids: Counting, Addition and Fun Number Puzzles

Copyright © 2026 · CraftGossip | Start Here | Contact Us | Link to Us | Your Editors | Privacy and affiliate policy