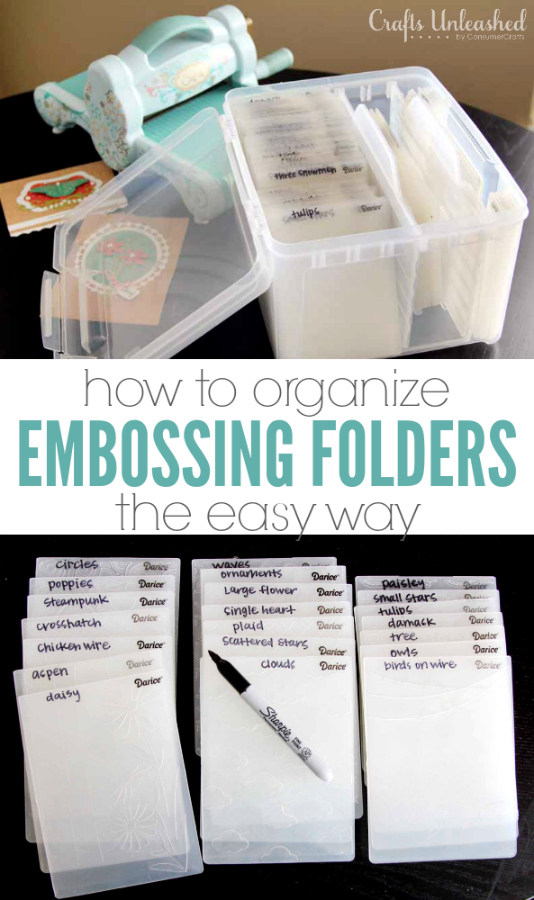
This simple system is the best way to store & organize your embossing folders. Follow along as Shaunte shows you how to organize embossing folders the easy way. Source: How to Organize Embossing Folders – Crafts Unleashed
Embossing folders are a must-have for any crafter who loves adding texture and depth to their paper crafting projects. However, with the growing number of embossing folders in your collection, it can be challenging to keep them organized and easy to find when you need them. Fortunately, there is a simple system that can help you store and organize your embossing folders effectively. In this article, we will guide you through the steps to help you get started with this system.
Materials you will need:
Iris Card Keeper: This is a plastic container that can hold up to 1000 5 x 7 inch cards. It has adjustable dividers, making it perfect for organizing your embossing folders.
Sharpie Permanent Marker: This is for labeling your embossing folders with the name and brand.
DYMO Label Maker: This is optional, but it makes labeling your dividers easy and clear.
Step 1: Gather your embossing folders
The first step is to gather all of your embossing folders and sort them by size and brand. This will help you to easily identify which folders you have and which ones you need to purchase.
Step 2: Label your embossing folders
Using a sharpie permanent marker, label each folder with the name and brand. This will make it easier for you to find the folder you need when you are working on a project. It is also helpful if you have duplicates or similar-looking folders.
Step 3: Organize your embossing folders
Now it’s time to organize your embossing folders in the Iris Card Keeper. The adjustable dividers make it easy to create compartments for each brand or size of the embossing folder. You can also use the DYMO label maker to create labels for each divider, making it even easier to find the folder you need.
Step 4: Store your embossing folders
Once you have organized your embossing folders, you can now store them in the Iris Card Keeper. Make sure to keep the container in a dry and cool place, away from direct sunlight, to prevent any damage to your folders.
Organization tips:
Use a storage container that fits your collection size. The Iris Card Keeper is perfect for those who have a large collection of embossing folders. If you have a smaller collection, you may want to consider using a smaller container.
Label each folder clearly. It’s important to label each folder with the name and brand so that you can easily find it when you need it.
Sort your folders by size and brand. Sorting your folders by size and brand makes it easier to find the folder you need when you are working on a project.
Keep your container in a dry and cool place. This will prevent any damage to your folders and ensure that they last for a long time.
Regularly review and purge your collection. It’s easy to accumulate embossing folders over time, but it’s important to review your collection regularly and remove any duplicates or folders that you no longer use.
Organizing your embossing folders using the Iris Card Keeper is a simple and effective way to keep your collection neat and tidy. By following these steps and tips, you can easily find the folder you need when you need it, and keep your collection in excellent condition for years to come.






I put mine in alphabetical order. Even easier to find the one I want.