• Home
  • Suggest A DIY
  • DIY Newsletter

Scrap Booking

Themes, layouts and inspirations

  • About CraftGossip
  • Our Network
    • Bath & Body Crafts
    • Candle Making Ideas
    • Crochet Ideas
    • Cross Stitch
    • Edible Crafts
    • Felting Patterns
    • Glass Art
    • Home & Garden Ideas
    • Indie Crafts
    • Jewelry Making
    • Kids Crafts
    • Knitting Patterns
    • Lesson Plans
    • Needlework
    • Party Ideas
    • Polymer Clay
    • Quilting Ideas
    • Recycled Crafts
    • Scrapbooking
    • Sewing Patterns
    • Card Making
    • DIY Weddings
    • Not Craft Ideas
  • Giveaways
  • Roundups
  • Store
  • Search

Tutorial | Easter Basket and Easter Grass

March 26, 2015 by Francine Clouden

Tutorial | Easter Basket and Easter Grass

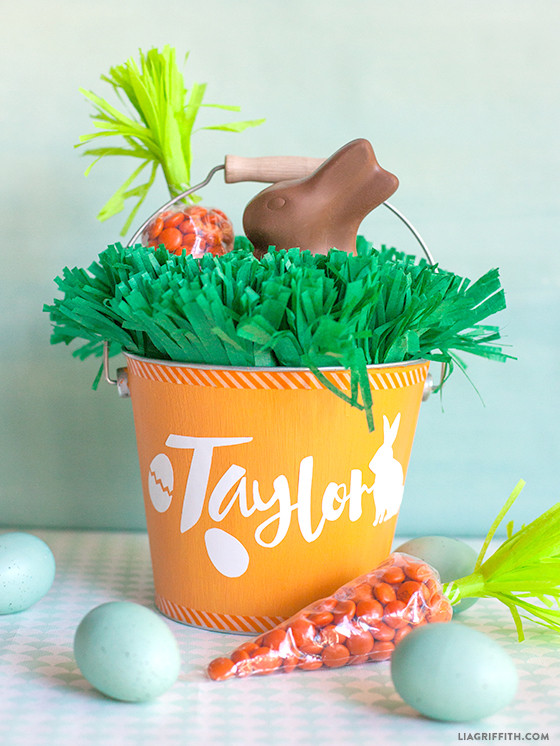
Want to create a super cute Easter basket for your kids that’s not only easy but also full of personal charm? It’s actually a lot simpler than you might think, and all you need are some basic craft supplies you probably already have lying around!

Here’s what you’ll need to get started:

  • Metal Bucket: Start with a small metal bucket as your base. This is going to hold everything together and gives your basket a sturdy foundation. You can find these in any craft store or even dollar stores. Bonus: they’re perfect for reusing year after year!

  • Paint: Now, here’s where you can really have some fun. Pick a paint color that suits the vibe you’re going for. Pastels are always a hit for Easter, so think light pinks, blues, yellows, or even a fresh minty green. You could paint the whole bucket, or just get creative with patterns like stripes, dots, or flowers. Make it as fun and colorful as you want!

  • Washi Tape: This stuff is a lifesaver for crafting—super easy to use and super cute! Use washi tape to add a little extra pop to your bucket. You can line the edges or make fun designs to give your basket that extra flair. It’s one of those things that makes your basket look high-end without the high price tag!

  • Green Tissue Paper: Here’s a fun little trick to make your basket look even more festive. Take some green tissue paper and scrunch it up to create your own “grass” for the bottom of the basket. It adds a playful touch and makes everything feel like it’s straight out of an Easter egg hunt.

  • Vinyl: Want to make this basket extra special? Personalize it! Grab some vinyl and cut out your child’s name to stick on the bucket. You can use a vinyl cutting machine if you have one, or just do it by hand—either way, it’s a great way to make the basket feel like it’s theirs. You could also add a fun design or a cute little Easter-themed image if you’re feeling crafty.

And of course, don’t forget the treats! Easter baskets are all about the goodies, so load it up with your kid’s favorite sweet treats. Think chocolate bunnies, jelly beans, pastel candies, or maybe even some little toys. If your child loves a certain character or theme, you can sneak in a small toy or sticker that fits the vibe.

In the end, this basket is all about creating something unique and filled with love. It’s an easy craft that brings a lot of joy—and let’s be honest, your kids are going to love it no matter what! Plus, it’s a great opportunity to get creative together. So, get crafting and have fun with it!

click here tutorial

«
»

Have you read?

12 Travel Adventure Scrapbook Layout Ideas

12 Travel Adventure Scrapbook Layout Ideas

Jessica’s amazing layout incorporates her photos into the large die cut title that fills her adventurous travel page. This is such a fun way to include pics and it helps narrow and focus in on what’s most important in the photo. There’s still room for a bit of stenciling in the background and lots of embellishments too though. Learn more at A Cherry on Top blog.

For many of us Summertime means time to hit the road and go out on an adventure. Whether you jump in the car for a day trip or a long road trip, hop on a plane, ship or train and head far away you’ll want to take lots of pictures on your travels to scrapbook when you arrive back home. Today let’s take a look at some fun Travel Adventure layouts and glean some inspiration to document our own vacation memories.

12 Travel Adventure Scrapbook Layout Ideas

Brianna used lots of layers of long, wide pattern paper strips on the background of her adventure layout but added a simple detail that makes a big impact and that rounding the corners with a punch. She’s also layered over top several travel photos, tags, tickets and accessories like luggage for lots of depth. Watch her process video at the Scrapbook and Cards Today blog.

12 Travel Adventure Scrapbook Layout Ideas

Inessa highlighted some pics of her trip to Paris by hanging them along the layout. She created top and bottom borders, the lower one is ripped, layered and stitched and the upper gives a nice straight grounding to hang photo tags from with burlap ribbon. There’s also lots of florals and a custom sticker letter title too. Find more details at the Paige Taylor Evans blog.

12 Travel Adventure Scrapbook Layout Ideas

I love Nathalie’s use of words on her Traveler’s Notebook pages! She used a printed “wander” pattern paper, cutting to fit on both sides of the design, adding sticker letters to complete her custom title. There’s also die cut words above her typed journaling along with stamped words and images as well as rub-ons too. She breaks it all down at the Cocoa Daisy blog.

12 Travel Adventure Scrapbook Layout Ideas

Nicole has an easy way to include more photos on her travel layout and that’s with an interactive flap on the side. It’s a fun way to extend your design and a cool area for journaling or special photos and you can use both front and back for so much extra room. Watch her process video at the Creative Memories blog.

12 Travel Adventure Scrapbook Layout Ideas

Julie asks an important travel question, “Where to Next”? I love how she included the letters on the inside of a large question mark, so clever! Off to the side is a wide border with lots of travel themed papers and a large cluster of travel related items like signs and tags around her trip photo in one corner. I spotted this idea on her Just Jules Instagram page.

12 Travel Adventure Scrapbook Layout Ideas

This cool digital design has retro distress strips diagonally on the background with a tall thin road trip photo in the center. It’s surrounded by lots of florals, leaves and some travel images too. I love the focus on a single picture! These products are from Sweet Shoppe Designs.

12 Travel Adventure Scrapbook Layout Ideas

Erin’s tropical getaway double page layout has room for loads of pics inspired by a sketch. There’s leafy pattern paper on the background accented with clusters of die cut leaves and a cute stamped monkey. There’s a few tiny gems, more stamping and a few travel accents scattered around too. I came across this on her Crafty Concepts with Erin Instagram page.

12 Travel Adventure Scrapbook Layout Ideas

Double pages don’t always have to flow into each other but they should go together like this design that uses the same collection of travel products. One side is filled with pattern paper, a large mat and a grid of 4 photos while the other has stacked borders and strips with a single pic and both have lots of fun travel words and phrases. Visit the Stampin’ Up blog for more details.

12 Travel Adventure Scrapbook Layout Ideas

Bruna’s digital design has a colorful globe inspired background that she broke up with a cool folded map accessory, messing “inking” and the large offset photo. She included embellishments that look like chipboard and vellum around the pic for some faux dimension as well. Find more details at the Traci Reed Designs blog.

12 Travel Adventure Scrapbook Layout Ideas

Kathleen’s stunning layout pulls from the beautiful sunset in the photo using strips of papers in the same colors as the sky. Each strip also has small embellishments in matching colors with a title and journaling down below. Stitching around the edges adds some nice texture too. Take a closer look at the Pinkfresh Studio blog.

They say getting there is half the fun so don’t forget to document those travel days in the car like Heather’s road trip layout. I love her distressed background of layered and torn pattern papers with clusters of accents including thick acrylic and wooden words and images and some paint splatter for depth and texture. Find all the info at the Bramble Fox blog.

I hope you’re able to head out on an adventure yourself this summer!!

-Heather

Looking for scrapbook supplies, we recommend A Cherry on Top.com

Explore

backgrounds Christmas Crafts Design Theory die cutting embellishments family Freebies Free Printables Holidays Inspiration - Layout Ideas Journaling News Paper Crafts Scrapbooking Themes Scrapbook Titles Techniques Tips and Tricks Tutorials Tutorials & Ideas

RSS More Articles

  • Cross Stitch a Gorgeous Cornucopia Wreath
  • Knit a Mosaic Shawl Inspired by Mythology
  • 12 Travel Adventure Scrapbook Layout Ideas
  • 12 Adorable Axolotl Crochet Patterns To Make
  • 12 Easy Sewing Projects To Make With Fat Quarters
  • Apple Knitting Patterns for Fall and Back to School
  • Learning about Gabon for Kids
  • 12 Beginner-Friendly Quilt Blocks That Are Perfect for Scraps
  • Crochet Pokémon Cards Are the Collectible Crossover Crafters Cannot Resist
  • Ranunculus Knitting Pattern: Why Knitters Keep Making This Famous Sweater

Copyright © 2026 · CraftGossip | Start Here | Contact Us | Link to Us | Your Editors | Privacy and affiliate policy