There’s something deeply satisfying about watching embossing powder melt.
That tiny moment when dull powder turns glossy and raised? Still magic. Every time.
If you’ve never tried heat embossing in scrapbooking, you’re missing one of the easiest ways to add texture, shine, and dimension to your scrapbook pages without bulky embellishments.
And if you have tried it but felt unsure about results — let’s fix that.
Today we’re talking about how to use heat embossing in scrapbooking layouts, plus practical embossing tips that actually work.
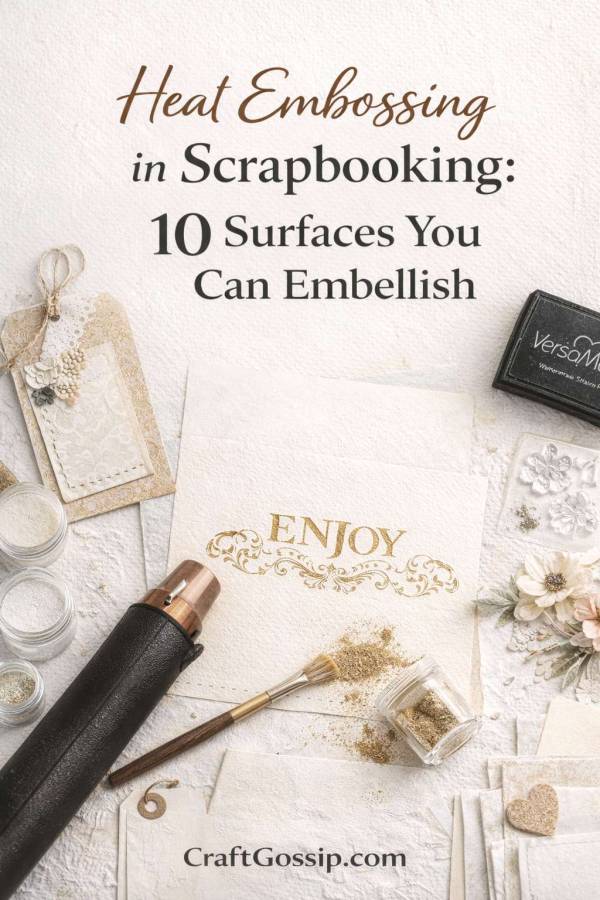
What Is Heat Embossing in Scrapbooking?
Heat embossing is a technique where you:
- Stamp an image or sentiment using embossing ink
- Sprinkle embossing powder over it
- Heat it with a heat tool until it melts
The result? A raised, glossy (or matte, depending on the powder) design that adds beautiful texture to your scrapbook page.
It works on:
• Cardstock
• Patterned paper
• Vellum
• Tags
• Journaling cards
And yes — once you start, you’ll want to emboss everything.
Why Use Heat Embossing on Scrapbook Pages?
If your layouts feel flat, embossing instantly elevates them.
Here’s why I love using embossing techniques in scrapbooking:
- Adds texture without bulk
• Creates elegant titles
• Makes embellishments pop
• Works beautifully for journaling accents
• Adds metallic or glossy highlights
It’s especially lovely on clean scrapbook layouts where you want subtle dimension.
How to Use Heat Embossing in Scrapbooking (Step-by-Step)
If you’re new to embossing, here’s the simple beginner method.
Step 1: Stamp with Embossing Ink
Use a clear embossing ink pad (sticky ink designed for powder).
Press firmly and evenly.
Pro tip: Use an anti-static powder tool first to avoid stray embossing powder sticking everywhere. (Learned that the messy way.)
Step 2: Add Embossing Powder
Sprinkle embossing powder over your stamped image.
Tap off excess powder.
If stray bits cling where they shouldn’t, gently flick them away with a small brush before heating.
Step 3: Heat It Up
Use a heat tool — not a hairdryer (trust me).
Move the heat tool slowly across the powder until it melts and turns glossy.
You’ll see the transformation happen. That’s when you stop.
Don’t overheat — paper can warp.
Best Ways to Use Embossing on Scrapbook Layouts
Let’s get practical.
Here are my favourite scrapbooking embossing techniques.
1. Embossed Titles
Stamp a bold word like:
• “Memories”
• “Celebrate”
• “Together”
Use white, gold, or clear embossing powder for a clean, professional look.
It creates a subtle raised effect without thick chipboard letters.
2. Embossed Background Accents
Stamp a repeating pattern lightly across your background and emboss it.
This works beautifully for:
• Floral backgrounds
• Subtle script text
• Geometric designs
It adds texture without overwhelming the page.
3. Embossed Borders
Stamp a small repeating design along the edge of your scrapbook page and emboss it.
It creates a custom border that feels polished.
4. Embossing on Vellum
Heat embossing on vellum creates a delicate, semi-transparent effect.
Perfect for layering over photos without blocking them completely.
Just heat gently — vellum warps easily.
Choosing the Right Embossing Powder
There are more options than you might think.
Common embossing powders include:
- Clear embossing powder
• White embossing powder
• Gold and metallic powders
• Glitter embossing powder
• Matte embossing powder
For scrapbook layouts, I often reach for:
White for clean, modern pages
Gold for elegant layouts
Clear for subtle dimension
You don’t need them all. Start with one or two.
Common Heat Embossing Mistakes (And How to Avoid Them)
Let’s save you some frustration.
Powder Sticking Everywhere
Use an anti-static tool before stamping.
Warped Paper
Heat from underneath first, then finish from the top.
Overheating
Stop once it turns glossy. More heat doesn’t make it better.
Smudged Stamps
Use a firm, even press when stamping.
Embossing isn’t difficult — it just requires patience.
Is Heat Embossing Beginner Friendly?
Absolutely.
If you can stamp, you can emboss.
It’s one of the easiest techniques to add to your scrapbooking toolkit, and it makes even simple layouts look more intentional.
You don’t need to emboss every page.
But when you want a subtle “something extra” — this is it.
Why I Still Love Embossing After All These Years
Trends change.
Supplies come and go.
But embossing? It’s timeless.
There’s something classic about a raised sentiment on a scrapbook page. It feels finished.
And honestly, watching that powder melt never stops being satisfying.
If you haven’t tried heat embossing in your scrapbook layouts yet, pull out that heat tool this weekend and test it on a scrap piece of cardstock.
Once you see that shine appear, you’ll understand.
Now tell me — are you team gold embossing powder, or do you prefer clean white?