• Home
  • Suggest A DIY
  • DIY Newsletter

Scrap Booking

Themes, layouts and inspirations

  • About CraftGossip
  • Our Network
    • Bath & Body Crafts
    • Candle Making Ideas
    • Crochet Ideas
    • Cross Stitch
    • Edible Crafts
    • Felting Patterns
    • Glass Art
    • Home & Garden Ideas
    • Indie Crafts
    • Jewelry Making
    • Kids Crafts
    • Knitting Patterns
    • Lesson Plans
    • Needlework
    • Party Ideas
    • Polymer Clay
    • Quilting Ideas
    • Recycled Crafts
    • Scrapbooking
    • Sewing Patterns
    • Card Making
    • DIY Weddings
    • Not Craft Ideas
  • Giveaways
  • Roundups
  • Store
  • Search

FREE Download Gnomes and Bees Images

May 19, 2022 by Heather Holbrook

FREE Gnome and Bees Images Download

This adorable images combine two trendy themes, gnomes and bees and how cute are they together!? This sweet little designs are FREE and can be downloaded, printed, cut and added to greeting cards, planner pages and scrapbook layouts. You can even print and cut them on sticker paper for custom stickers.

Visit The Hungry Jpeg to get them.

-Heather

Looking for more digital stamps and SVG files? We love using the Design bundle to download our digital stamps. Make sure you check out their free section for free digital stamps. These free digital stamps and SVG files change all the time and you can grab some great seasonal stamps as well as everyday digital stamps and fonts that you can use.
«
»

Have you read?

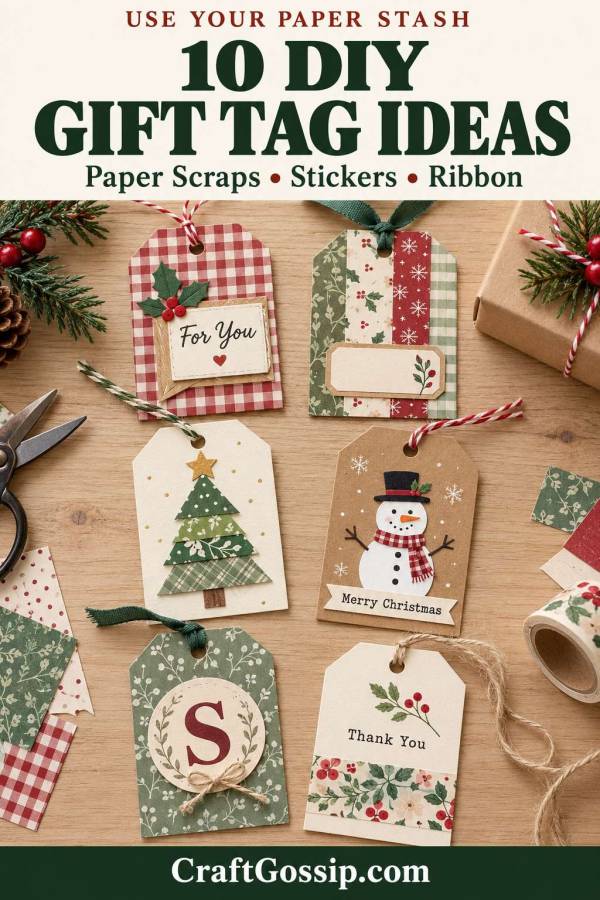
DIY Gift Tags Using Scrapbooking Supplies You Already Have

You know that little pile of patterned paper you keep because it’s far too lovely to throw away, but apparently too small for an actual scrapbook page? This is its moment.

Making DIY gift tags with scrapbooking supplies is a satisfying way to use those paper offcuts, half-finished sticker sheets and ribbon pieces that have been quietly multiplying in a drawer.

A handmade tag can make plain wrapping paper look thoughtfully coordinated. It also gives you a small, manageable project when you want to craft without clearing enough table space for an entire album.

These gift tag ideas work beautifully for Christmas, but you can change the colours and embellishments for birthdays, thank-you gifts, teacher presents and little handmade treats.

Start with a sturdy cardstock base, choose a few supplies from your stash and leave somewhere to write the recipient’s name. Everything else is the fun part.

What Scrapbooking Supplies Can You Use for Gift Tags?

Gather a small selection rather than emptying every drawer. Too many choices can turn a quick project into an afternoon of rearranging stickers.

Useful supplies include:

  • Cardstock offcuts
  • Patterned scrapbook paper
  • Journaling cards and cut-apart sheets
  • Alphabet stickers
  • Small die cuts and paper ephemera
  • Washi tape
  • Stamps and ink
  • Ribbon, twine or embroidery thread
  • Paper punches
  • Flat-backed embellishments
  • Double-sided tape or craft glue
  • Foam adhesive, if you want a little dimension

You’ll also need scissors or a paper trimmer, a ruler, a pencil, a hole punch and a pen.

For most tags, 200–300 gsm cardstock makes a useful starting base. If your paper feels flimsy, attach it to a stronger backing before decorating.

A basic hole punch and paper trimmer are handy tools to look for on Amazon if you need replacements, but you don’t need a specialist tag die or cutting machine for this project.

How to Make a Basic Gift Tag Without a Template

A 2½×4-inch tag gives you a comfortable decorating area without overwhelming an ordinary gift.

  1. Cut a cardstock rectangle measuring 2½×4 inches.
  2. At one top corner, mark ½ inch along the top edge and ½ inch down the side.
  3. Join the marks and cut off that corner.
  4. Use the small triangle as a guide to trim the opposite top corner.
  5. Punch a hole centrally, approximately ? inch below the top edge.
  6. Write your message on the back before adding dimensional decorations.
  7. Decorate the front, keeping the hole clear.
  8. Thread through approximately 10–12 inches of ribbon or twine and adjust the length to suit your gift.

You can keep one undecorated tag as a tracing template for the next batch.

For a smaller tag, try a 2×3-inch rectangle. Reduce the corner cuts to approximately ? inch and choose just one main decoration.

1. Layer Patterned Paper Scraps

This is the easiest place to start because the paper does most of the decorating.

Cut a patterned-paper panel measuring 2¼×3 inches and attach it to the lower section of your 2½×4-inch tag. Leave a narrow cardstock border visible around the sides and bottom.

Add a smaller plain label with a stamped greeting or handwritten name.

Choose one lively pattern and one quieter supporting colour. Two equally busy prints can compete, especially on such a small surface.

Christmas variation: Pair red gingham with cream cardstock and a small green star.

Year-round variation: Use florals, polka dots or stripes with a simple “For You” label.

2. Turn Paper Strips into a Patchwork Background

Narrow paper strips are ideal for tags because you don’t need long, matching pieces.

Cut several strips slightly wider than your tag. Arrange them horizontally, vertically or diagonally across the front, then glue them down.

Once the adhesive has dried, turn the tag over and trim away the overhanging edges. Repunch the hanging hole if it has been covered.

Add a plain sentiment panel so the words stand out against the patterned background.

This is particularly useful for those thin offcuts left after trimming photo mats. Yes, the ones you’ve been saving in a bag labelled “useful bits.”

3. Make Christmas Tree Tags from Triangles

Cut a triangle from green patterned paper and attach it near the centre of a cream or kraft tag. Add a tiny rectangle beneath it for the trunk.

For a more playful tree, stack three triangles, with the smallest at the top. Overlap them slightly and finish with a small star sticker.

You can also make a tree from horizontal paper strips. Arrange them from shortest to longest, leaving small gaps between each strip.

Keep the design flat if the gift needs to travel.

Try this: Make three coordinating trees using different green papers, then use the same ribbon on each tag to bring the set together.

4. Give Leftover Stickers Their Own Little Scene

An almost-empty sticker sheet can be perfect for a tag.

Choose one main sticker, such as a snowman, flower, bird or birthday cake. Place it on a small contrasting paper panel, then add a short sentiment.

If the sticker has lost its grip, secure it with a little suitable adhesive rather than relying on the old backing.

Try to resist filling every remaining space. One well-placed sticker often looks more polished than six tiny ones competing for attention.

Christmas variation: A single ornament sticker above a handwritten name.

Year-round variation: A flower sticker with “A Little Thank You.”

5. Use Alphabet Stickers for Personalised Initial Tags

Alphabet sheets tend to reach that awkward stage where you have seven letters nobody needs and no vowels.

Gift tags offer a smaller challenge.

Use one large initial as the main decoration, mounted on a circle or square of contrasting cardstock. Write the full name on the back so there’s no confusion when several family members share the same initial.

If the letter colour doesn’t suit your project, mount it on a neutral panel to help it stand out.

This works particularly well on gifts wrapped in plain kraft paper, where the tag can become the main decorative feature.

6. Turn Journaling Cards into Quick Gift Tags

Small journaling cards and scrapbook cut-apart panels often already have a frame, image or greeting.

Select a 3×4-inch card, reinforce it with cardstock if needed, and punch a hole at the top. Trim the corners into a tag shape if you like, or leave it rectangular.

Check both sides before cutting. A lovely pattern is less useful if it leaves nowhere to write.

For larger cards, cut around a design rather than automatically trimming through the centre. You might get one good tag and several smaller embellishments from the same panel.

Christmas variation: Use a card with a festive phrase and add a plain “To” label.

7. Make Stamped Tags with a Border of Washi Tape

Start with plain cardstock and add a strip of washi tape across the bottom or along one side.

Stamp a greeting in the remaining space. Test your stamp and ink on a spare piece of the same cardstock first, then allow it to dry before handling.

Wrap the tape ends around the back for a neat finish, or trim them flush and secure any lifting corners.

If you don’t have sentiment stamps, use a handwritten greeting. A simple black pen can look lovely against colourful tape.

Try repeating the same stamp across a batch, changing only the tape and ribbon.

8. Fussy-Cut Flowers, Leaves or Christmas Motifs

Look for patterned papers with individual images you can cut out: flowers, leaves, stockings, stars or little houses.

Cut around one or two motifs and layer them onto a plain tag. A narrow border around the image can make cutting easier and give the finished piece a softer look.

For dimension, lift just one small element with thin foam adhesive. Keep the rest flat so the tag doesn’t become top-heavy.

Christmas variation: A small cluster of holly leaves with a greeting.

Year-round variation: One large flower and a little name label.

This is also a useful way to rescue a paper you love when there isn’t enough left for a full background.

9. Add Ribbon Loops and Flat Embellishments

Short ribbon pieces can become part of the design rather than just the hanging tie.

Fold a small length into a loop and attach the ends behind a paper label. Glue the label onto the tag so the ribbon ends are hidden.

Finish with a flat paper flower, a small die cut or an enamel dot that suits the design.

Choose an adhesive appropriate to the materials and let it set before tying the tag onto a gift.

For parcels that will be posted, favour paper decorations and flat ribbon over bulky buttons or raised clusters.

10. Make a Rustic Tag with Recycled Backing

A clean piece of thin packaging card can give patterned paper scraps a sturdy base.

Cover the printed side with scrapbook paper, trim it into your tag shape and add a plain writing panel to the reverse if needed.

Use clean, dry packaging with a smooth surface that cuts neatly. Thick corrugated cardboard can be harder to punch and tie.

Our cardboard gift tag tutorial explores another way to make textured tags from recycled materials.

For a softer rustic look, take inspiration from these brown paper bag tags. Attach lightweight bag paper to cardstock if you want a firmer gift tag.

How to Make a Coordinated Batch Without Making Every Tag Identical

Choose three things to repeat:

  • The same tag shape
  • A small colour palette
  • One ribbon or twine

Then vary the decoration.

For example, a Christmas set could include a paper tree, an initial, a stamped greeting and a sticker scene. Using cream bases, red-and-green scraps and the same twine will help the tags feel like a collection.

Work in stages: cut all the bases, prepare the decorations, write the backs, then assemble. It’s easier than repeatedly switching between scissors, glue and the missing hole punch.

Small Details That Make Handmade Gift Tags Look Better

Leave room for the name. If the front is fully decorated, keep the back plain.

Reinforce delicate holes. Glue a small cardstock circle over the hole area, allow it to dry, then punch through both layers.

Match the tag to the wrapping. Busy wrapping usually suits a quieter tag. Plain paper can carry a more decorative design.

Use glue sparingly. Too much wet adhesive can buckle thin papers. Double-sided tape is useful for flat paper layers.

Check that everything is secure. Give ribbons and raised decorations a gentle tug before attaching the tag to your gift.

Keep a few tags neutral. A little supply of “For You” and “Thank You” tags is useful long after the Christmas decorations are packed away.

Turn a Set of Tags into a Small Handmade Gift

A coordinated bundle of gift tags makes a thoughtful extra for someone who enjoys wrapping presents.

Tie six or eight together with ribbon and tuck them into a small envelope. Leave the backs blank so the recipient can use them throughout the season.

If you enjoy working with tag shapes, our Christmas tag scrapbook mini album shows another way to use them for photographs and memories.

You could also save a photograph of your finished tags before giving them away. It’s a handy record when you want to revisit a favourite design next year.

The nicest part of this project is seeing those overlooked scraps become something useful. A small piece of gingham, one leftover sticker and a short length of ribbon can be enough.

Start with a few tag bases and the supplies already on your table. By the time you’ve finished, that little pile of “too nice to throw away” paper might finally be a little smaller.

Explore

backgrounds Christmas Crafts Design Theory die cutting embellishments family Freebies Free Printables Holidays Inspiration - Layout Ideas Journaling News Paper Crafts Scrapbooking Themes Scrapbook Titles Techniques Tips and Tricks Tutorials Tutorials & Ideas

RSS feed: More Articles More Articles

  • DIY Gift Tags Using Scrapbooking Supplies You Already Have
  • Chaos at the Christmas Knit-Along: A Cosy Knitting Mystery to Watch
  • 5 Elegant Christmas Table Ideas Without Buying Flowers
  • How To Make A Christmas Lace Bowl From An Old Doily
  • How to Sew a Christmas Stocking: An Easy Beginner Tutorial
  • 10 Handmade Christmas Necklaces That Make Sweet Holiday Gifts
  • Make-Ahead Slushie Bases: Mix Once, Chill All Week
  • Velvet Ribbon Paper Chains for Christmas: A Lovely No-Sew Decorating Idea
  • Snowflake Quilt Blocks for Winter and Christmas Quilts
  • Free Crochet Angel Fridgie Pattern

Copyright © 2026 · CraftGossip | Start Here | Contact Us | Link to Us | Your Editors | Privacy and affiliate policy