• Home
  • Suggest A DIY
  • DIY Newsletter

Scrap Booking

Themes, layouts and inspirations

  • About CraftGossip
  • Our Network
    • Bath & Body Crafts
    • Candle Making Ideas
    • Crochet Ideas
    • Cross Stitch
    • Edible Crafts
    • Felting Patterns
    • Glass Art
    • Home & Garden Ideas
    • Indie Crafts
    • Jewelry Making
    • Kids Crafts
    • Knitting Patterns
    • Lesson Plans
    • Needlework
    • Party Ideas
    • Polymer Clay
    • Quilting Ideas
    • Recycled Crafts
    • Scrapbooking
    • Sewing Patterns
    • Card Making
    • DIY Weddings
    • Not Craft Ideas
  • Giveaways
  • Roundups
  • Store
  • Search

DIY Origami Photo Stand

August 5, 2016 by Francine Clouden

Display extras of those special photos with a creative twist using these DIY origami photo stands! We often tuck our most cherished snapshots into albums or scrapbooks, but sometimes it’s lovely to keep those memories close—on your desk, shelf, or bedside table where you can see them every day. These origami photo stands are the perfect way to do just that.

With just a few simple folds and your favorite patterned paper, you can turn a plain sheet into a beautiful, functional photo holder. The folding technique is easy to learn, even for beginners, and once you’ve mastered it, you’ll be whipping up these stands in no time.

They’re not only great for displaying pictures, but also perfect for holding mini artworks, motivational quotes, or even name cards at a party or wedding. Customize them to match your home decor or event theme by choosing papers in different colors, prints, and textures.

Best of all, these photo stands can be made in a variety of sizes to suit everything from wallet-sized prints to larger 5x7s. Whether you’re crafting just one or a dozen, this little project adds a personal, handmade touch to how you showcase your memories.

Source: Origami Photo Stand | I Try DIY
«
»

Have you read?

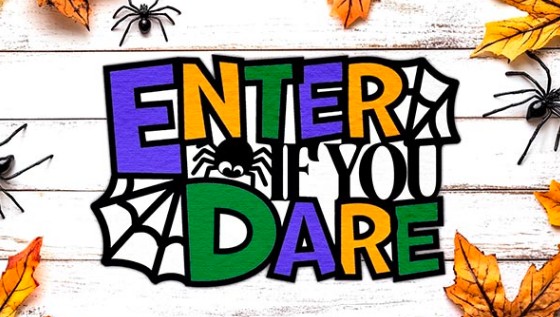
FREE Layered “Enter if You Dare” Halloween Die Cut

This creepy “Enter if You Dare” die cut is made up of 5 layers to create an amazing title for your Halloween scrapbook layouts. There’s large letters that you can cut from different colors of cardstock to suit your design needs and a layering base to cut from black that has spider webs and a little spider too. If you popped up each layer with foam tape you could make a fun 3D effect too. This FREE SVG cut file could also be used to create signs and decor for Halloween parties or shrunken down for a handmade card sentiment as well.

Click here to visit Like Love Do for the download.

-Heather

Shop Halloween supplies at A Cherry on Top.com


Explore

backgrounds Christmas Crafts Design Theory die cutting embellishments family Freebies Free Printables Holidays Inspiration - Layout Ideas Journaling News Paper Crafts Scrapbooking Themes Scrapbook Titles Techniques Tips and Tricks Tutorials Tutorials & Ideas

RSS feed: More Articles More Articles

  • Stitch a Simple Sack Hat that Looks Like a Turkey
  • Free Christmas Holly Tablecloth Embroidery Pattern Review
  • Free Felting Tutorial Friday: Happy Little Felted Christmas Trees
  • Poppy Crafts for Remembrance Day
  • FREE Layered “Enter if You Dare” Halloween Die Cut
  • 6 Dairy-Free Keto Dinner Recipes Without Cheese or Dairy Cream
  • DIY Farmhouse Christmas Bells Review – An Easy Rustic Ornament You Can Make on a Budget
  • DIY Simmer Pot Gifts: 4 Beautiful Blends from Budget to Luxury, Plus Printable Tags
  • Meaningful Handmade Christmas Gifts You Can Make from What You Already Have
  • Designer Spotlight: Living on the Rainbow

Copyright © 2026 · CraftGossip | Start Here | Contact Us | Link to Us | Your Editors | Privacy and affiliate policy